Sunday, 31 January 2016

Soul Food Sunday #5

Evening!

Better late than never eh?

I have quite a few pics of SW friendly food ideas to show you already, for today I chose some comfort food, you know when you need to feel you've eaten something naughty.

I can't eat this myself this week though because I'm on SP for a week,so only speed food and protein, if it works well then I'm in with a chance of reaching my 8 stone target on Thursday, I'd like that...


So I think I'll call this Comforting Fried Potatoes

I sliced some tinned new potatoes, celery, red onion and bacon, threw it in the frying pan with Frylight spray, added a sprinkle of paprika and chives. Fry for 5 minutes.


Add a good portion of sliced mushrooms and fry for a further 5 minutes to brown the spuds.

That's it, done!

I did tell you I only do easy food.

Next week I think we'll have another pudding dish.

Thanks for stopping by!


Friday, 29 January 2016

Finish it Friday #lost count!

Hello!

Thanks for popping in, it's time for Finish it Friday, except that I can't remember what week I'm on....

So, out of the little box of abandoned bits, I plucked these..

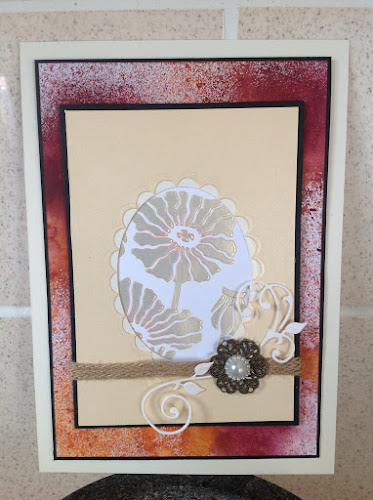
I thought the sprayed piece was too dark to stamp on, for my taste anyway, so I thought I'd just use it as a background piece, the poppies were done with gold texture paste, the apertures were left over from a class, and swirls just seem to multiply in my house!

And this is what I did, the red swirl was too big so I opted for the smaller cream one.

I resisted the urge to put some text on because I don't know what I'm gonna use it for yet.

That's it for me today, I'll be back tomorrow with a new challenge at Fantasy Stampers.

Happy Friday!


Wednesday, 27 January 2016

Workshop Wednesday #1

Afternoon!

As there was no Groovi Tuesday this week, we need a Workshop Wednesday instead, usually it will just be a little peek at a project I've done in a workshop, past or present, but as today is the first one we'll have a step by step...

Grab your Lapwing stamps ready and a piece of Clarity stencil card.

Using Cobalt archival ink, stamp the lapwings in place, take note of where the big fella is at the bottom, cover the birds with masks. Put a border of low tac tape around all four sides and put a moon mask in place.

Prepare your Brayer with Clover adirondack ink

Brayer the sky, then the bottom area too, leave a nice band of white through the middle though.

Using the Tangle stencil and clarity brushes, add a little texture to the bottom area only, just sweep gently in one direction from the bottom of the stencil upwards.

Remove the moon mask and replace with the aperture part instead, gently add a little weathered wood ink along one side of the moon.

Remove all masks and masking tape.

Use a marker or pencil to add shade to the birds, note, I used an alcohol marker even though I stamped with archival, I was very very careful not to touch the stamped line art with the marker or it could make it bleed and ruin my pen.

Terrible shadow on this pic, sorry!

The finished one is a bit better, but I'll never be a photographer.

Hope you like it, the class did once they got over the fear of the Brayer, funnily enough Barbara mentions fear of the Brayer on her blog today, Dave's strategy made me laugh!

Thanks for stopping by, hopefully see you Friday for another piece of bodged artwork from heartbreak corner.


Sunday, 24 January 2016

Soul Food Sunday #4. A day in the life..

Hi there, thanks for popping in.

I'm asked a lot on FB to post what I eat, so today instead of showing you one idea, I thought id show you a whole day.

So the day I chose started with breakfast, wierdly enough...

That little lot contains 1/2 a syn for the HECK Paprika sausages.

Onto lunch...

Potato skins stuffed with tomato, mushrooms, peppers, little fat free cottage cheese, topped with chives and grilled. Zero syns!

Dinner next...

Sweet n Sour chicken, this is a syn free Slimming World recipe, it is seriously nice, I could have had boiled rice with it, but I just wanted to eat it on it's own.

So up to now I've had 1/2 a syn out of my allowance, which means I can eat alllllllll of this too...

And if I was hungry in between I can eat tons of fruit, muller light yogurt.

Drinks?

I can have plenty of tea and coffee if I use my milk allowance, couple of diet cokes, diet bitter lemon.

So that's my day! I feel full just looking at the pics.

Enjoy your Sunday.


Friday, 22 January 2016

Finish it Friday #11

Morning!

I'm a bit behind myself today, but I definitely wanted to make time to drag a few unloved, half finished and abandoned bits out of my box...

So I started with these bits, a spritzy mop up piece, a couple of pieces that had been part painted and stamped/stencilled.

I got excited though and started stamping the tags before I took photo.

I used Archival ink to stamp the Shepherds Purse, Butterfly and Make a Wish, all from Claritystamp.

So, nice and quick, I blended Faded Jeans distress ink around the spritzy piece, stencilled with the netting stencil from Clarity

Coloured the tags with pencil and added some string.

Done!

So what have you used up this week?

Have a great weekend, mine's a bit busy, Catterick tomorrow then Shrewsbury Sunday and race straight to Manchester to see a band!


Tuesday, 19 January 2016

Groovi Tuesday #3 Better Days

Morning!

I'm trying to feel upbeat today, but it's tricky when there's people and animals all around you that are having a tough time. So I changed the Groovi project I'd planned to blog for this one that I demo'd on tv.

Wishing Better Days to those who really need them!


Put a border of your choice in place, then plant a single tree.

Three tags next, all in a line.

Add some landscape and a sunset/sunrise.

Add the greeting, I've decided I'm more successful if I put it on a separate piece of parchment then use that to centre it on my actual project.

A little white work on the tree leaves and tops of the letters.

Start adding colour, I used two blues for the lake and two greens and a yellow for the tree.

Use various earthy tones for the hills. A nice deep colour around the tags.

I mounted up onto dark card using the Groovi corner punch.

Done.

Thanks for popping in, hope you have a good day whatever you're up to.


Monday, 18 January 2016

Groovi and stampin, together!

Good Morning, hope you had a good weekend.

I thought id start the new week by showing you a few cards that combine Claritystamps and Groovi.

 
The Owls were stamped in Black Archival ink first, then the Groovi work was done.

The chicken was done the traditional parch way, stamp the chicken on copy paper then trace it onto parchment, then re-trace it with number 2 stylus on the foam mat.

Oops, I sneaked a Christmas card into the mix, my bad!
The Goose was done the traditional way too.

And another one with the Owls, I love them.

So what you waiting for, go stamp your mark on your Groovi, put it on Facebook so we can all see what you made.

Have a good one!


Sunday, 17 January 2016

Soul Food Sunday #3

Hello!

Time for another foody blog post.

I've had Risotto a couple of times this week, the first one I had was made using stuff from the fridge that needed using up.

I took my little chopping machine out, it's so cool, you just put your food in and pull the cord a few times!

So I chopped a leek, half an onion, 3 mushrooms, small piece of brocoli including the stalk, a green pepper, some butternut squash.

I sprayed my pan with frylight and fried some of my chopped mix with a bit of bacon with no fat.

After 5 minutes, I added a handful of rice and a cup of chicken stock. Bring to the boil and simmer for 10 minutes.

Tasted great, used up a few bits, and syn free!

The other Risotto I had was made by Amber, she makes great risotto, always makes me feel a bit better when things are a bit rubbish.

Here's Amber's instructions...

Gently fry a chopped onion for 5 minutes

Add some uncooked rice to the onion for a couple of minutes

Add some veggie stock with Worcester sauce, and a chopped pepper and some Mange Tout, bring to the boil and simmer for 12 minutes.

Thanks for stopping by, see you Tuesday!


Saturday, 16 January 2016

Fantasy Stampers, all about the boy...

Evening!

Hope you're all keeping warm, and safe too, looks like there's snow in lots of areas today, none here yet and don't want it here!

Today I have my dt card for the new challenge over at Fantasy Stampers...

The theme is all about the boy, I don't have much in the way of boy stamps, but my Clarity stag is a fine looking boy don't you think?

I also used the cherry blossom stamp and part of a sentiment stamp, it actually says 'with warmest wishes for a wonderful Christmas' but I like using just the warmest wishes part.

Hope you like it, please pop over to the Fantasy Stampers blog and see the lovely cards the other team members created, and you have 2 weeks to join in the challenge if you wish.

Thanks for stopping by, come back tomorrow for Soul Food Sunday.


Wednesday, 13 January 2016

Groovi handbag

Hello!

I promised to blog a step by step for the little bag I demo'd at 6pm-actually, I haven't promised anything yet because it's only 5pm and I'm still in the green room waiting to go and do the 6pm show lol, but I will promise to blog, don't think about it too much or you'll get a headache lol.

So, on the assumption I said id do it, and on the assumption you liked the project, here is the step by step....


Start with A4 parchment

The left edge of the parchment is lined up against the side of the largest square, bottom of parchment is lined up with bottom edge of the plate.

Right then, put the three sides of the 3rd square, and all of the 4th square.

Slide parchment to the left, have a squint at the pic above to see where I'm lined up to, then repeat the 3rd and 4th squares.
Now put a tinsy bit in place at the top, see in the pic?
Using the circle plate, put the handle in place.
On both sides
Put part of the frill in place
Put the flowers in the frill
And the trellis
 

Use your white pencil in an upward sweep motion on the frill

And the trellis

Bit of pencil on the flowers too.

Put a name in if you want?

Colour if you want, it's your call!

Cut as in piccy, and add tape

Carefully fold score lines and put it together, does it look something like this?

I've had to blog this very quickly, so apologies if i missed anything, just Shout me if you have any questions!


Thanks for popping in!